Adding a new employee into Cashbook's payroll
Adding a New Employee into Cashbook's Payroll
Cashbook Platinum

Before adding a new employee get him/her to:
- fill in a Tax File Number Declaration form and return it to you. Order this form from the ATO website: Tax file number declaration
- fill in a Superannuation (Super) Standard Choice Form and return it to you. Obtain this form from the ATO website: Superannuation (super) standard choice form

You will need the information provided in the above forms in front of you when entering the details into Cashbook.
Step 1: To Add an Employee
- Click on the Payroll toolbar icon
- If this is the first time using the Payroll system, the following messages may appear:
- Click Yes to Confirm message:
- Click Yes to Confirm message:

- Click OK to the Information message:

 Note: Downloading the latest Tax Scales means that Cashbook can automatically calculate how much tax to withhold from payments you make to your employees.
Step 2: Enter Employee Personal Details
- Click Add Employee

ii. In the Wages Record / Employee Details window, fill in the employee details.
For example:

iii. Tick the Add Pay Transactions to Cashbook checkbox to automatically enter pays into the cashbook
 Ensure you setup all wages and superannuation accounts for payroll correctly in the Chart of Accounts. Click on the following link for step-by-step instructions: Accounts needed when adding an employee to Payroll.
 Note: There is the option to allocate the wages and super expense for a particular employee to a particular Enterprise
iv. Click OK
v. Click OK to Error message: ' You must set a tax scale.' This will automatically take you to the Tax and Super window
Step 3: Enter Tax and Super details
- Fill in all information provided to you by the new employee
For example:

ii. Click OK
Step 4: Enter in Applicable Pay Rates
- In the Standard Pay tab section select:
- Pay Frequency - i.e. how often you are paying your new employee.(eg. weekly, fortnightly, etc.)
- Pay By - i.e. how you are paying your employee. (Cheque, Cash, EFT, etc.)
- Pay Frequency - i.e. how often you are paying your new employee.(eg. weekly, fortnightly, etc.)
For example:

ii. Click on the Wages/Salary tabiii. Click Addiv. In the Add a new Wages/Salary Item window, enter wages/salary information for new employee
For example:

v. The Super checkbox should be automatically ticked as part of Pay Type setupvi. The Taxable checkbox should be automatically ticked as part of Pay Type setupvii. Tick one of the following Optional Cashbook Account options for pays to be automatically entered in cashbook records:
- Include with wages, (select this option if you have already set up wages and super accounts in the Employee Details window) or
- Allocate to a nominated cashbook account/enterprise
viii. Click OK to save
Still in Applicable Pay Rates:
- Click on the Allowances tab
- Click on the Deductions tab
- For step-by-step instructions on setting up Allowances and Deductions, click on the following link: Allowances and Deduction in wages/salaries.
Step 5: Leave Records (Annual Leave, Sick or Personal Leave, Long Service Leave, Special Leave e.g. Time in Lieu)
- For step-by-step instructions and understanding Leave Records setup, click on the following link: Employee Leave entries.
Step 6: Pays
Now you are ready to enter a pay for the employee
- Click Add Pay
- Enter the correct Pay For Period Ended date and Date Paid
- Click Print Pay Slip
- Click Yes to Confirm message: ' You must save any changes to this pay before the pay slip can be printed. Do you want to save the changes and print the pay slip?'
- Click Yes to Information message: ' Do you want to add this pay into your cashbook?'
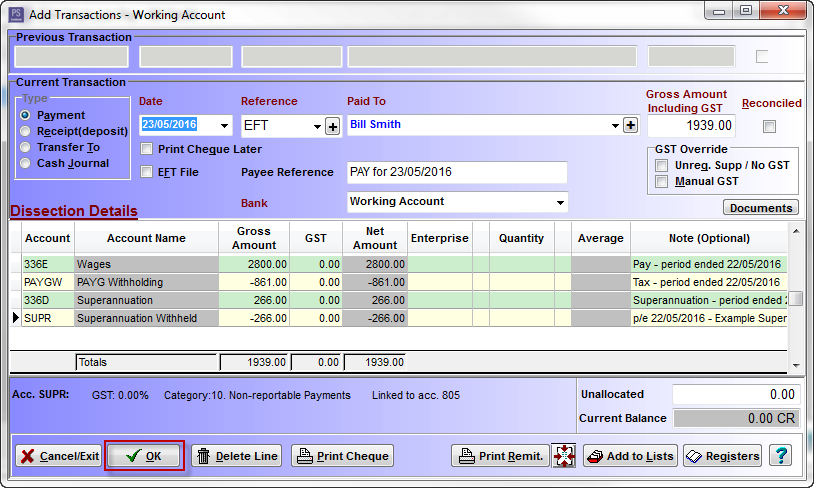
- Click OK button to add the pay transaction into Cashbook
- Click on print icon to print pay slip
- Just click on OK if you do not wish to print the pay slip but just want to add this pay into Cashbook
An example of a pay transactions generated in Payroll, automatically added to Cashbook:

Example of a pay transaction for a particular employee, saved in Payroll:

Article ID 1611