Create a New Budget Using Previous Years Actual Data
Create a New Budget Using Previous Years Actual Data
Cashbook Platinum
Part A: Create a Budget in the Previous Financial Year
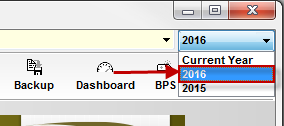
Step 1: Change Year
- Change accounting year to the previous financial year
Step 2: Advanced Budgets
- Click on Budgets
- Advanced Budgets menu option

Step 3: New
- Click on File
- New menu option

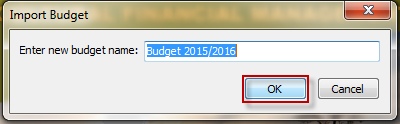
Step 4: Enterprise
- Name - Enter a name for the new budget
- Click on the Using Enterprise(s) radio dial
- Select an option, e.g. <All Enterprises>
- Click OK to continue
For example:

v. Click Yes to the confirm message: 'Do you want to automatically add all accounts and banks to their relevant sections?'
vi. Click OK to Information message: ' Please enter opening values for the enterprises in this new budget.'
vii. Enter the Opening values for all enterprises or these can be entered at a later point
viii. Click OK to continue
Step 5: Apply
- Click on the budget name, located under the Open and Save toolbar icons
- Change budget date range to the previous financial year
- Click Apply to save

iv. Click Yes to the Confirm message: 'Making the budget start earlier can cause issues with opening balances. Are you sure you want to proceed?'
v. Click Yes to the Confirm message: 'WARNING: Changing the date range requires saving the budget and reloading it. Any data outside the new date range will be lost. Proceed?'
vi. Click OK to the Warning message: 'Please note that you should not print any budget related reports in Cashbook until the budget has finished saving. Failure to observe this warning may result in incorrect reports.'
Part B: Import previous year actual data
Step 1: Import Actual Data
- Click on the budget name. e.g. Budget 2015/2016 (located under the Open and Save toolbar icons.)
- Click on Tools
- Import Actual Data menu option

iv. Click on the month/year at the bottom of the Import Actual Data Up to and including: box. e.g. June 2016
v. Click on the radio dial to select the Data to Import. e.g. All Data
vi. Click on the radio dial to select figures to Use. e.g. Accrual
 Note: The main difference between accrual and cash basis accounting is the timing of when revenue and expenses are recognized. The cash method is most used by small businesses and for personal finances. The cash method accounts for revenue only when the money is received and for expenses only when the money is paid out. On the other hand, the accrual method accounts for revenue when it is earned and expenses goods and services when they are incurred. The revenue is recorded even if cash has not been received or if expenses have been incurred but no cash has been paid. Accrual accounting is the most common method used by businesses.
vii. Click on the Import button to import actual data from cashbook

Step 2: Confirm
-
Click Yes to Confirm message: 'Proceed with importing the specified data?'
-
Click OK to the Success message: 'Import Complete.'
-
Click on the Save toolbar option or click on File > Save menu option
-
Click OK to the Warning message: 'Please note that you should not print any budget-related reports in Cashbook until the budget has finished saving. Failure to observe this warning may result in incorrect reports.'
-
Click on the Exit button at the bottom of the screen
Part C: Export budget
Step 1: Export
Still in the previous financial year
- Click File
- Data Transfer
- Export menu option

Step 2: Advanced Budget Data
-
Click on the Advanced Budget Data tab
-
Tick the check box next to the budget you wish to select. e.g. Budget 2015/2016
-
Either click on the Browse button to select a backup location on your computer or another drive or tick the Send this file to the Practical Systems Data Warehouse on completion.
-
Click OK to proceed with export
-
Click Yes to Confirm message: Proceed with exporting the selected data to C:\Cashbook Backups\CBAdvBudget 2016-10-10 14.56.44.zip?'
-
Click OK to Information message: ' Export Complete'

Part D: Import budget into Current Year
Step 1: Change Year
- Change accounting year to Current Year

Step 2: Import
- Click on File
- Data Transfer
- Import menu option

-
Load the export file ...
-
Either:
-
Click on Load Export ... button. - Locate, click on your saved exported file, then click on the Open button
-
Tick Load from Data Warehouse box to select exported file
-
-
-
Select data to import ...
- Tick the check box next to the budget, in the Import Selection - data in the incoming file box
- Tick the check box next to the budget, in the Import Selection - data in the incoming file box
-
Select import options ...
- Tick all check boxes
- Tick all check boxes
-
Import the data ...
- Click on the Import button
- Click on the Import button
-
Click Yes to Confirm message: ' Are you sure that you wish to import the selected advanced budget data into company "Sunshine Farm"?
-
Click OK to the following:
- Click OK to Information message: 'Import Complete'
Part E: Create a New Budget in This Financial Year
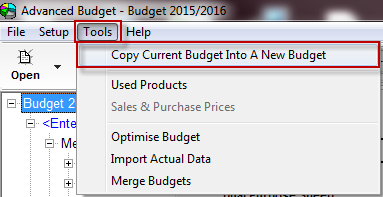
Step 1: Budget
- Click on the Budgets toolbar option

 The imported budget should now be listed
ii. Click on the drop-down arrow on the Open toolbar option and select imported budget, e.g. Budget 2015/2016
iii. Click on the Tools
iv. Copy Current Budget Into A New Budget menu option
In the Copy Budget Data To New Budget window:
- New Budget Start At: e.g. 07/2016 The start month/year of your budget.
- New Budget Name: e.g. Budget 2016/2017
- Click OK to continue

Step 2: Confirm
-
Click Yes to Warning message: 'Are you sure you want to proceed with copying the data?'
-
Click OK to Warning message: ' Please note that you should not print any budget-related reports in Cashbook until the budget has finished saving. Failure to observe this warning may result in incorrect reports.'
-
Click on the budget name e.g. Budget 2016/2017, which is located directly under the Open and Save toolbar icons
-
Click on up or down arrows to enter correct budget date range
-
In Budget Settings box, click on up and down arrows to select the correct Default budget date range
-
Click Apply

vii. Click Yes to Confirm message: WARNING: Changing the date range requires saving the budget and reloading it. Any data outside the new date range will be lost. Proceed?'
viii. Click OK to Warning message: ' Please note that you should not print any budget-related reports in Cashbook until the budget has finished saving. Failure to observe this warning may result in incorrect reports.'
Article ID 1689