Errors: Import Actual Data into Budget
Errors: Import Actual Data into Budget
Cashbook Platinum
After Importing Actual Data into the Advanced Budget, the following message may appear:

After clicking OK, the user will receive a report similar to the following:

This error occurs specifically with Crop Enterprises. In Advanced Budgets, crop gross margins are budgeted at an individual crop level (e.g. 2014 wheat crop or 2015 wheat crop, etc.) and therefore need to ensure that each required crop enterprise has the applicable crop ID's (Class) attached to them.
Using the above example, i.e. ' Account 227F maps to a Direct Cost of the budget for crop enterprise WHBA, but no class is available.' to illustrate how to fix this issue:
- WHBA is the crop enterprise code for Wheat.
- The Crop Identifiers (i.e. Crop ID or Class) are the year the wheat crop was produced. i.e. 2014, 2015, 2016, etc.
- All direct costs relating to a particular crop must be allocated to the appropriate Enterprise (i.e. Wheat) and Crop ID (i.e. the specific year).
Step 1: Exit
- Click Exit to close out of Advanced Budgets
- Click No to the Confirm message: 'Save changes to current budget?'
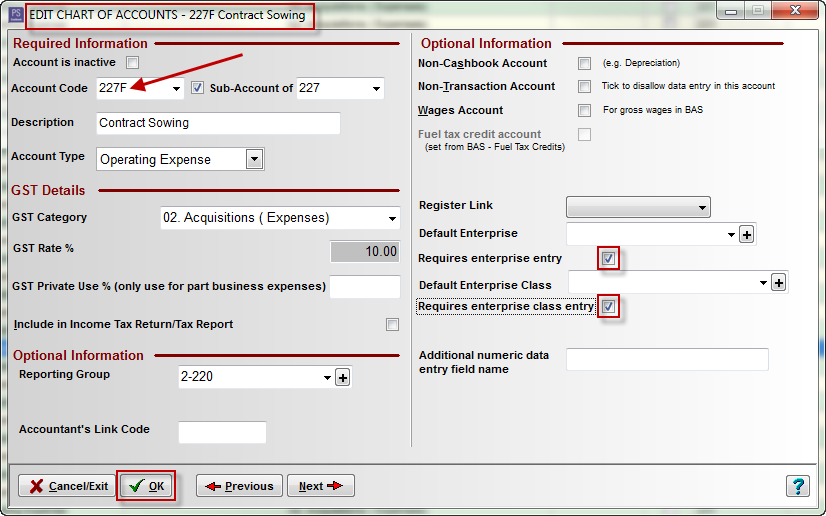
Step 2: Chart
- Click on the Chart icon
- Enter the account code (for this example - 227F) into the Search For Code entry box

iii. Click Edit at the bottom of the screeniv. Make sure the following check boxes are ticked:
- Requires enterprise entry
- Requires enterprise class entry
v. Click OK to save
Step 3: Review
- Click Review
- Enter the Account Code in the entry box
- Click on the transaction/s to highlight
- Click Edit

v. Click OK to the Information message: 'This invoice is linked to a cashbook transaction. There are some fields that can not be changed.' (if applicable)
vi. In the Edit Supplier Invoice window:
- Click on the Invoice Details line with the account code, for this example 227F
- Tab through this line and select an Enterprise ID
- Click OK to save


Note: if there is more than one transaction for a particular Account Code, you must edit each transaction until you are sure all have been allocated an Enterprise ID.
Step 4: Transaction Check
- If there are numerous error messages relating to the one account code, the easiest way to locate the specific transactions that are missing the Enterprise ID's, is to run a transaction check.
To run a Transaction Check:
- Click Utilities
- Transaction Check menu option
- Click OK when the transaction check window appears
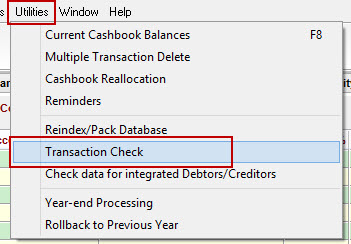
iv. Click OK to the following Information message

An example of a report produced by a Transaction Check:

- Locate each transaction listed in the report produced after running a Transaction Check
- Edit each transaction and add a enterprise class (ID) next to the enterprise in that dissection
Article ID 1595