What to do when you get a new computer?
What to do When you Get a New Computer?
Cashbook Platinum
There are a number of steps involved in Installing Cashbook on a new computer and transferring data across:
- Backup data from old computer
- Install PS Cashbook onto new computer
- Register new PS Cashbook installation
- Restore data from backup
Step 1: Back up data

For the purpose of transferring company data to a new computer you need to backup all company/all years to an external backup location, such as online storage (Practical Systems Data Warehouse) or a portable device (USB)
Backing up One Company
- Click File
- Backup Data
- Individual Company menu option
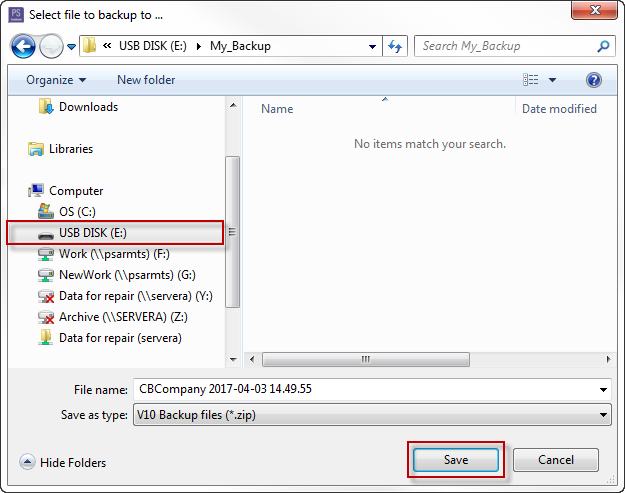
- In the Backup Company screen, click on Browse
- Locate USB in the file explorer. It will be marked as Removable Disk or USB Disk in Computer or My Computer
- Click Save
- This will take you back to the Backup Company screen
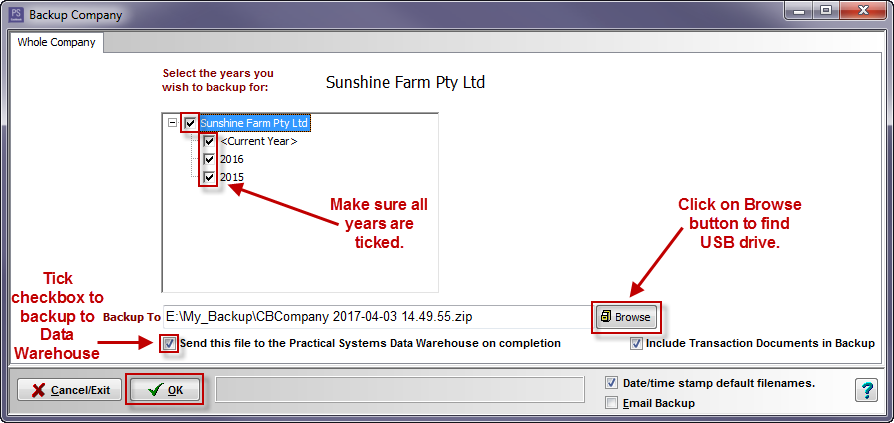
viii. Tick all the years listed underneath your company name, including Current Year
ix. Tick the Send this file to the Practical Systems Data Warehouse on completion checkbox, if you also wish to backup to the Data Warehouse
x. Click OK. After processing, your files will be saved onto the USB
xi. Click Yes to the Confirm message: 'Proceed with backing up the selected data to E:\My-Backup\CBCompany 2017-04-03 14.49.55.zip?'
xii. Click OK to the Information message: 'Backup Complete.'
xiii. If you ticked the Send this file to the Practical Systems Data Warehouse on completion option, click OK to Information message: 'You will now be asked to login to the data warehouse server. Once logged in your backup will be uploaded.'
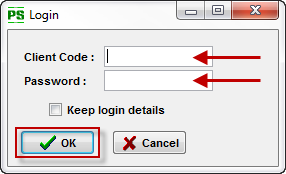
xiv. Enter your Practical Systems client code and password
xv. Click OK to continue
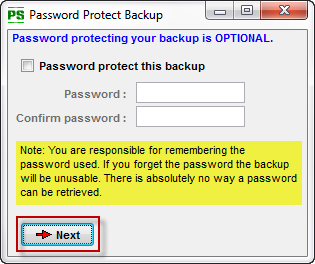
xvi. Click Next
xvii. Enter a description for the backup file
xviii. Click OK to continue

xix. Click OK to the Information message: 'The File has been successfully uploaded to the server.'
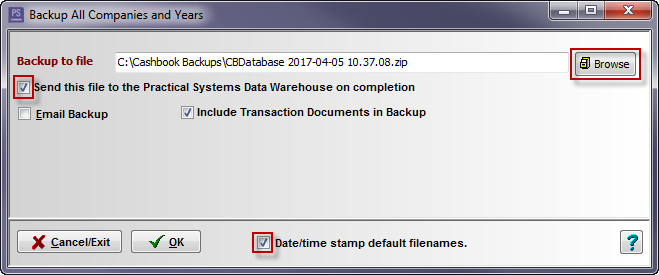
Backing up More than One Company
- Click File
- Backup Data
- All Companies/Years menu option
- In the Backup All Companies and Years screen
- Tick the Send this file to the Practical Systems Data Warehouse on completion box
- Tick Date/time stamp default filenames checkbox
- Click on the Browse button
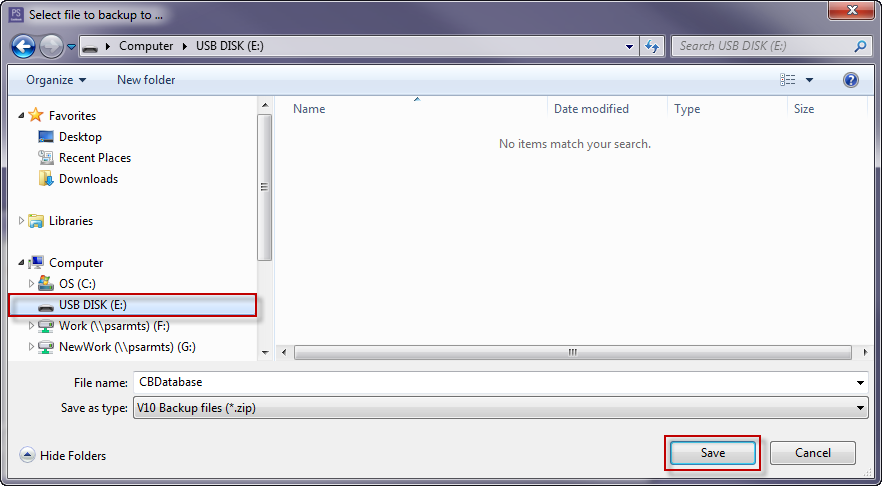
v. Locate USB in the file explorer. It will be marked as Removable Disk in Computer or My Computervi. Click on the Save button. This will take you back to the Backup All Companies and Years screen
vii. Click OK. After processing, your files will be saved onto the USB
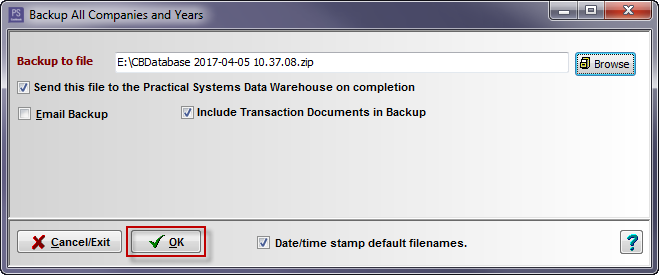
viii. Click Yes to Confirm message: 'Proceed with backing up all companies, all years to E:\CBDatabase 2017-04-05 10.37.08.zip?'ix. Click Yes to Confirm message: 'Backup Complete. Do you want to verify it?'x. Click OK to Information message: 'Verification successful.'xi. If you ticked the Send this file to the Practical Systems Data Warehouse on completion option, click OK to Information message: 'You will now be asked to login to the data warehouse server. Once logged in your backup will be uploaded.'
xii. Click Next
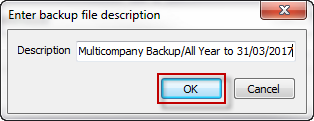
xiii. Enter a description for your backup filexiv. Click OK to continue
xv. Click OK to the Information message: 'The File has been successfully uploaded to the server.'
Step 2: Installing Cashbook onto the New Computer
To ensure you are installing the most up to date version of PS Cashbook it is best to install the program from our website.
- Go to www.practicalsystems.com.au
- Click on Insights and Support
- Client Downloads
- You may than have to enter you Client ID and Password
- Click Login
vii. Click on the cashbook_....exe download to Run
viii. Click Run
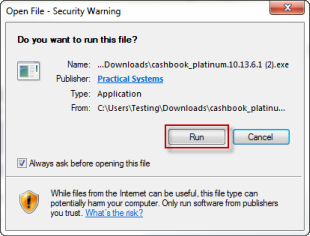
ix. Click Yes to message: 'Do you want to allow the following program to make changes to this computer?'
x. Click Next

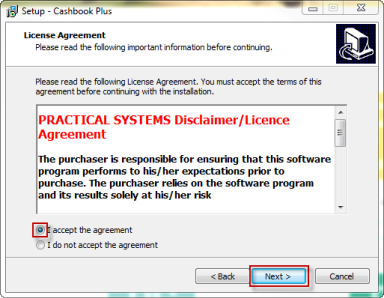
xi. Click on the I accept the agreement radio dial
xii. Click Next
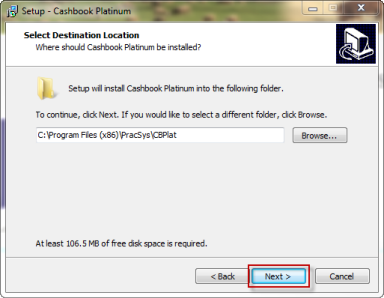
xiii. Click Next
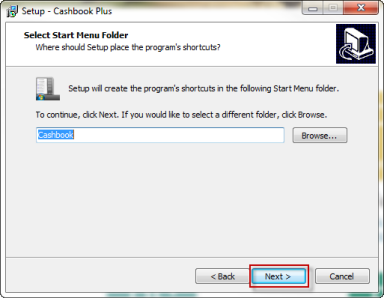
xiv. Click Next
xv. Click Install

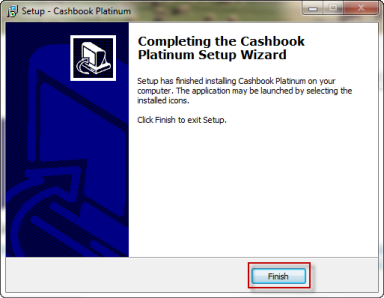
xvi. Click Finish
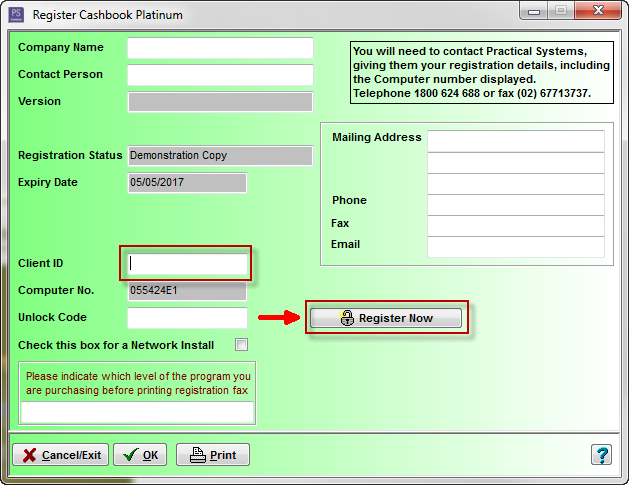
Step 3: Register your Program
- When the Cashbook installation is complete, double click on the Cashbook Platinum icon on the Desktop
- The Register Now window will appear:
- Enter your Client ID and Password
- Click Register Now
- Enter your Client ID and Password
If you have skipped this window by clicking on Go to Demo, you will need to register your program using the following steps:
- Click File
- Registration menu option
- Enter your Client Id
- Click Register Now
viii. Click Yes to the following Confirm message:
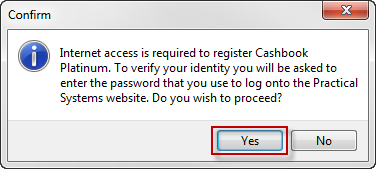
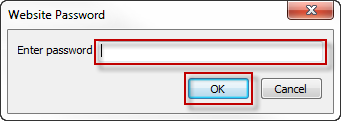
ix. Enter your Practical Systems password:x. Click OK
xi. Click OK to the Information message: 'Cashbook has been registered as level 4 purchased.'
xii. Click OK to the Information message: 'Your database will now be updated to reflect the new Client ID. Please click OK to continue.'
Step 4: Restore Data
- Restore data from the saved backup
Article ID 1895